Rod
Font Eng 101: The Basics
A brief introduction to the basic concepts and tools you might need if you are a software engineer who wants to Do Things to fonts. Primarily aimed at people working on Google Fonts.
- Basic Typography Knowledge, context for all the technology that follows. The glossary is good.
- Basic Work Environment
- FontTools, a library for inspection and manipulation of OpenType fonts
- TTX, a commandline tool to convert fonts to/from xml
- TTFont, a Python class to read/write OpenType fonts
- pyftsubset, a tool to subset and optimize OpenType fonts
- OpenType Fonts, the dominant modern font format
- Glyph IDs and ‘cmap’, overview of how Unicode codepoints map to things you can draw
- Building Fonts with Fontmake
- Drawing Text, actually putting something on the screen
- Web serving
- DIY Google Fonts, build a totally viable python implementation of Google Fonts
Basic Work Environment
I assume you have:
- SSH access to github (instructions)
- A Python virtual environment (venv)
# create lots, typically one for every discrete thing you are working on python3 -m venv venv source venv/bin/activate - If on Mac, install coreutils so
realpathis present. Homebrew:brew install coreutils.
FontTools
FontTools is the swiss army knife of fonts. It lets you load, modify, and save a font from Python.
I assume you want to be able to mess with the source, and that you have an active venv. If you don’t need to play with the code just pip install fonttools. If you just want to browse the source see https://github.com/fonttools/fonttools
Local Setup
git clone git@github.com:fonttools/fonttools.git
pip install -e fonttools/
TTX
TTX is an xml representation of a binary font. FontTools can transform to/from TTX, meaning you can make changes to a font binary by converting it to TTX, editing the XML, and converting it back again.
The examples assume a clone of https://github.com/google/fonts exists in ./fonts.
Let’s try it out with a Google Font:
ttx fonts/ofl/lato/Lato-Regular.ttf
# open and browse around fonts/ofl/lato/Lato-Regular.ttx
# If we made some changes and wanted to generate an updated font binary:
ttx -o /tmp/MyLato.ttf fonts/ofl/lato/Lato-Regular.ttx
Sometimes we just want to glance at a single table. For example, let’s dump the ‘name’ table for Lato:
ttx -o - -t name fonts/ofl/lato/Lato-Regular.ttf
To see what axes and named instances a variable font supports we could dump ‘fvar’:
ttx -o - -t fvar fonts/ofl/mavenpro/MavenPro\[wght\].ttf
See also FontTools explanation of TTX here.
TTFont
TTFont is a Python class that can
read/write OpenType font files. For example, let’s suppose we decided Lato-Regular.ttf had the wrong metadata for weight and we want to fix usWeightClass programmatically:
# clone https://github.com/google/fonts, assumed to be in ./fonts for this example
python
>>> from fontTools import ttLib
>>> font = ttLib.TTFont('fonts/ofl/lato/Lato-Regular.ttf')
>>> font['OS/2'].usWeightClass
400
>>> font['OS/2'].usWeightClass = 500
>>> font.save('/tmp/Lato-Modified.ttf')
# Ctrl+D to exit python repl
We could confirm our edit with TTX:
ttx -q -o - -t "OS/2" /tmp/Lato-Modified.ttf | grep usWeight
    <usWeightClass value="500"/>
pyftsubset
pyftsubset lets you cut up fonts.
If you look at the CSS Google Fonts send to consumers (ex Roboto) you can see a bunch of different @font-face blocks, each with it’s own unicode-range. The browser will download only the parts required to render the characters on the page (more detail on this here).
Let’s suppose we want to cut a cyrillic block out of Roboto, matching the unicode-range for cyrillic from /css2:
/* cyrillic */
@font-face {
  font-family: 'Roboto';
  font-style: normal;
  font-weight: 400;
  src: local('Roboto'), local('Roboto-Regular'), url(https://fonts.gstatic.com/s/roboto/v20/KFOmCnqEu92Fr1Mu5mxKOzY.woff2) format('woff2');
  unicode-range: U+0400-045F, U+0490-0491, U+04B0-04B1, U+2116;
}
We’ll start from fonts/ofl/roboto/Roboto[wdth,wght].ttf, which supports many scripts, and cut out everything but cyrillic:
pyftsubset --help
pyftsubset "fonts/ofl/roboto/Roboto[wdth,wght].ttf" \
  --unicodes="U+0400-045F, U+0490-0491, U+04B0-04B1, U+2116" \
  --output-file=/tmp/Roboto-Regular-Cyrillic.ttf
The subsetter can also be used as a library:
python
>>> from fontTools import subset, ttLib
>>> font = ttLib.TTFont("fonts/ofl/roboto/Roboto[wdth,wght].ttf')

>>> subset_opts = subset.Options()
>>> subsetter = subset.Subsetter(options=subset_opts)
>>> subsetter.populate(text='ABC')
>>> subsetter.subset(font)
>>> font.save('/tmp/Roboto-ABC.ttf')
You can also use the fontTools subsetter to drop hints, remove unwanted layout features, etc.
The original file is, at time of writing, 168KB. The cyrillic subset is 24KB. By default pyftsubset performs a number of optimizations that remove parts of the font unlikely to be needed for web usage. If you want to remove characters and keep everything else you have to opt out of this. See --help.
OpenType Fonts
The font format of most interest to Google Fonts, supported by most modern operating systems, browsers, etc is OpenType. The font is made up of a header plus a collection of “tables”. Each table has a specific binary structure documented in the spec. A given font includes some subset of these tables.
Glyph IDs and the ‘cmap’ table
To understand the OpenType format it’s helpful to have a basic mental model of how it works. Here is mine:
- The core construct is an array of glyphs
- This is not how it’s represented internally but it can be thought of this way
- A glyph is instructions on how to draw something.
- It is NOT a character / letter
- The indices of glyphs are called “glyph ids” or “gids”
- We’ll use “gid” henceforth
Let’s construct a simple example. We’ll subset Roboto down to A,B,C plus some support glyphs, then look at it’s gids and how unicode characters are mapped onto those gids.
For example,

glyphs [ notdef ][ null ][ drawing of letter A ][ drawing of letter B ][ drawing of letter C ]
gid     0         1        2                      3                      4
If we want to render “A” (U+0041 in Unicode) using this font we have a problem: how do we know what gid to use? This is handled by the ‘cmap’ table, which maps character codes (Unicode or otherwise) to gids. Let’s look at an example by subsetting Roboto down to ABC using pyftsubset:
pyftsubset "fonts/ofl/roboto/Roboto[wdth,wght].ttf" \
  --text="ABC" \
  --output-file=/tmp/Roboto-Regular-ABC.ttf
FontTools tries to give you the glyphs by name as well as gid. For example, using our subset Roboto:
python
>>> from fontTools import ttLib
>>> font = ttLib.TTFont('/tmp/Roboto-Regular-ABC.ttf')
>>> font.getGlyphOrder()
['.notdef', 'A', 'B', 'C']
>>> [font.getGlyphID(name) for name in font.getGlyphOrder()]
[0, 1, 2, 3]
We can also see the this in the TTX output:
ttx -q -t cmap -o - /tmp/Roboto-Regular-ABC.ttf
You should see something like:
<?xml version="1.0" encoding="UTF-8"?>
<ttFont sfntVersion="\x00\x01\x00\x00" ttLibVersion="4.2">

  <cmap>
    <tableVersion version="0"/>
    <cmap_format_4 platformID="0" platEncID="3" language="0">
      <map code="0x41" name="A"/><!-- LATIN CAPITAL LETTER A -->
      <map code="0x42" name="B"/><!-- LATIN CAPITAL LETTER B -->
      <map code="0x43" name="C"/><!-- LATIN CAPITAL LETTER C -->
    </cmap_format_4>
    <cmap_format_4 platformID="3" platEncID="1" language="0">
      <map code="0x41" name="A"/><!-- LATIN CAPITAL LETTER A -->
      <map code="0x42" name="B"/><!-- LATIN CAPITAL LETTER B -->
      <map code="0x43" name="C"/><!-- LATIN CAPITAL LETTER C -->
    </cmap_format_4>
    <cmap_format_12 platformID="3" platEncID="10" format="12" reserved="0" length="28" language="0" nGroups="1">
      <map code="0x41" name="A"/><!-- LATIN CAPITAL LETTER A -->
      <map code="0x42" name="B"/><!-- LATIN CAPITAL LETTER B -->
      <map code="0x43" name="C"/><!-- LATIN CAPITAL LETTER C -->
    </cmap_format_12>
  </cmap>

</ttFont>
Building Fonts with Fontmake
Fontmake is a command-line tool that compiles font sources to binary OpenType fonts. It supports sources in either Glyphs.app format or UFO format (which is the native format used by Robofont app and can be imported/exported in most font editors).
Fontmake is just the compiler frontend, so to speak. Most of the heavy lifting work is done under the hood by a collections of Python libraries, including:
- glyphsLib: to parse Glyphs files and convert them to UFO format.
- ufo2ft: takes UFO font objects and uses FontTools to build the various OpenType tables.
- cu2qu: converts cubic Bezier curves (as used by most font editing apps for drawing) to the kind of quadratic splines used in TrueType-flavored OpenType fonts.
You can install the fontmake CLI tool as usual with pip install fontmake.
Or you can also download a self-contained zip-app from the fontmake releases
page. Pick the one matching your local python3 version and platform, unzip it and run
it like a regular executable.
For example, say you want build a variable font for the Oswald project:
$ git clone https://github.com/googlefonts/OswaldFont
$ cd OswaldFont
$ fontmake -g sources/Oswald.glyphs -o variable
You’ll find your Oswald-VF.ttf inside ./variable_ttf subfolder.
If you want to build static instances, you use -i option:
$ fontmake -g sources/Oswald.glyphs -i
By default fontmake will build both TTF and OTF static fonts (respectively in
instance_ttf and instance_otf folders).
Read fontmake --help for more options.
Drawing Text
Once our font is looking good we might want to render text with it. A full text rendering stack is typically a collection of components. We’ll look primarily at the open options:
- Shaping: given a sequence of character codes, figure out what gids should be drawn at what positions
- The leading open tool for shaping is HarfBuzz (code, documentation)
- HarfBuzz definition of shaping
- If this is your first encounter with shaping beware, it’s WAY more complicated than it might sound
- What HarfBuzz doesn’t do
- Justification
- Rendering
- Actually putting pixels onto the screen.
- Skia is a leading open 2d graphics library.
See also A Tour of Android Typography.
Building HarfBuzz
See https://harfbuzz.github.io/building.html
hb-shape
Let’s shape some text using the HarfBuzz
hb-shape tool. The examples assume harfbuzz is cloned and compiled at ./harfbuzz and a clone of https://github.com/google/fonts exists at ./fonts.
harfbuzz/util/hb-shape --help
harfbuzz/util/hb-shape "fonts/ofl/roboto/Roboto[wdth,wght].ttf" "ABC"
[gid37=0+1336|gid38=1+1275|gid39=2+1333]

# ...What?
harfbuzz/util/hb-shape --help-output-syntax

# OK, I just want gid and advance
harfbuzz/util/hb-shape "fonts/ofl/roboto/Roboto[wdth,wght].ttf" "ABC" \
                       --no-glyph-names --no-clusters
[37+1336|38+1275|39+1333]
Hopefully this illustrates that hb-shape runs on a single run of characters in a single font and tells you what gids to use and how to lay them out. You still need something else to actually DO that, but HarfBuzz has done a LOT of the hard work for you.
hb-view
hb-view lets you shape and render a string. For example:
harfbuzz/util/hb-view "fonts/ofl/roboto/Roboto[wdth,wght].ttf" "ABC" \
                      --output-file=/tmp/roboto-abc.png
# Open /tmp/roboto-abc.png in your viewer of choice
Web Serving
Sometimes after you create a font you want to use it on the internet. There are several tools and technologies you are likely to encounter:
- OpenType Sanitizer (OTS)
- Chrome and Firefox reject fonts that don’t pass OTS checks
- The simplest way to test is to load your font in a browser and if it doesn’t work check devtools for a console message about failing OTS
- You can also build OTS from source and use the ot-sanitise utility; we’ll show an example later
- WOFF2
- The best available font compression format, available in all modern browsers (https://caniuse.com/#feat=woff2)
- unicode-range
- Allows us to cut up a font (perhaps using pyftsubset or hb-subset), tell the browser about the pieces and what characters they contain, and have it download only the ones it actually uses.
- Our IUC42 presentation on CJK (here) talks more about unicode-range and how it can be used to serve large fonts
DIY Google Fonts
Let’s use some of the tools we’ve seen and build our very own copy of Google Fonts! - note that we’re going to use python http.server which is NOT suitable for production according to it’s documentation.
Basic Server
# Google Fonts fonts
git clone git@github.com:google/fonts.git

# Grab all the fonts and put them into /byogf/fonts
mkdir -p byogf/fonts
find fonts -path 'fonts/*/*/*.[ot]tf' -execdir cp {} $(realpath byogf/fonts/) \;
ls -l byogf/fonts | wc -l # should be ~3,000
Now we have byogf/fonts setup let’s make ourselves a server. Create a file in byogf called font_server.py with the following content:
from http.server import HTTPServer, SimpleHTTPRequestHandler
import textwrap
import urllib

_CSS_FOR_STYLE = {
    'Thin': 'font-weight: 100;',
    'ExtraLight': 'font-weight: 200;',
    'Light': 'font-weight: 300;',
    'Regular': '',
    'Medium': 'font-weight: 500;',
    'SemiBold': 'font-weight: 600;',
    'Bold': 'font-weight: 700;',
    'ExtraBold': 'font-weight: 800;',
    'Black': 'font-weight: 900;',
}
_CSS_FOR_STYLE.update({k + 'Italic': v + ' font-style: italic;'
                       for k, v in _CSS_FOR_STYLE.items()})
_CSS_FOR_STYLE['Italic'] = _CSS_FOR_STYLE.pop('RegularItalic')

class FontHandler(SimpleHTTPRequestHandler):
    def _serve_css(self):
        family, style = self.path[1:].split('/')
        style_css = _CSS_FOR_STYLE[style]
        css = f'''
        @font-face {{
            font-family: '{family}';
            {style_css}
            src: url(/fonts/{family}-{style}.ttf) format('truetype');
        }}
        '''
        css = textwrap.dedent(css)

        self.send_response(200)
        self.send_header('Content-Type', 'text/css; charset=utf-8')
        self.end_headers()
        self.wfile.write(css.encode('utf-8'))

    def do_GET(self):
        if self.path == '/favicon.ico':
            self.send_response(404)
            self.end_headers()
        elif self.path.startswith('/fonts/'):
            super().do_GET()
        elif self.path.endswith('.html'):
            super().do_GET()
        else:
            # Blindly assume CSS request!
            self._serve_css()


if __name__ == '__main__':
    print('Starting server, use <Ctrl-C> to stop')
    HTTPServer(('', 8080), FontHandler).serve_forever()
Start it similar to python3 font_server.py. Try urls like http://localhost:8080/Lobster/Regular or http://localhost:8080/Lato/ThinItalic in your browser. Try creating a file byogf/demo.html with content similar to:
<!DOCTYPE html>
<html>
<head>
  <style>
    @import url(http://localhost:8080/Lobster/Regular);
    @import url(http://localhost:8080/Lato/ThinItalic);
    .lobster {
      font-family: 'Lobster';
    }
    .lato100i {
      font-family: 'Lato';
      font-style: italic;
      font-weight: 100;
    }
    body {
      font-size: 4em;
    }
  </style>
</head>
<body>
  <div class="lobster">Hello, World</div>
  <div class="lato100i">Hello, World</div>
</body>
</html>
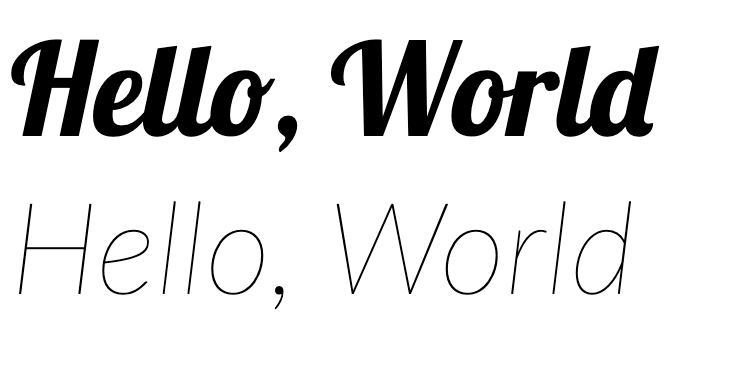
Load by requesting http://localhost:8080/demo.html in your browser. You should see text in Lobster and Lato, similar to:
If you look in browser dev tools (in Chrome: right-click, inspect, choose the Network tab) you should see the font downloads in ttf format.
Congratulations, you have implemented your own version of Google Fonts!
Compression
Serving the raw font files is fine, but we can do better. We’ll replicate Google Fonts transparent upgrade to woff2. Just like Google Fonts (woff2 blog post), our users won’t have to change anything about their integration: font downloads get smaller for all users as soon as the server updates.
# Create compressed copies using woff2
# woff2 has submodules, use --recursive to grab them too
git clone --recursive https://github.com/google/woff2.git
(cd woff2 && make clean all)

# warning: SLOW; we "pay" now to make our users downloads faster
# If you are just playing maybe do a subset of the files, perhaps -name 'Noto*.[ot]tf'
time find byogf/fonts -name '*.[ot]tf' -execdir ./woff2/woff2_compress {} \;
Now we have a woff2 file for every font, add it to the CSS. Open font_server.py and amend the CSS construction:
BEFORE
        css = f'''
        @font-face {{
            font-family: '{family}';
            {style_css}
            src: url(/fonts/{family}-{style}.ttf) format('truetype');
        }}
        '''
AFTER
        css = f'''
        @font-face {{
            font-family: '{family}';
            {style_css}
            src: url(/fonts/{family}-{style}.woff2) format('woff2'),
                 url(/fonts/{family}-{style}.ttf) format('truetype');
        }}
        '''
Restart the server and retry your demo.html. You should see in dev tools that you are now downloading woff2 files instead of ttfs.
unicode-range
unicode-range lets us cut a font into pieces, tell the browser what codepoints are available in each piece, and have the browser download only the pieces it needs. The CSS looks like this:
/* Simplification of http://fonts.googleapis.com/css2?family=Merriweather */

/* cyrillic */
@font-face
    font-family: 'Merriweather';
    src: url(.../merriweather/cyrillic.woff2); /* Download this */
    unicode-range: U+0400-045F;                /* If page uses these codepoints */

/* latin */
@font-face
    font-family: 'Merriweather';
    src: url(.../merriweather/latin.woff2);    /* Download this */
    unicode-range: U+0000-00FF;                /* If page uses these codepoints */
Google Fonts publishes files listing how we cut up fonts here.
For Chinese, Japanese, and Korean (CJK) we cut each font into a larger number (~100) of pieces (explained in our IUC42 presentation). The CJK subsetting files are not published at time of writing.